The Right Way to Wire a Pole Barn for Power and Tools
Wiring a pole barn the right way turns a plain structure into a functional workshop, storage space, or hobby zone. Spring is the ideal season to tackle this project in Ohio, with mild temperatures making trenching, conduit runs, and panel work far easier than in the frozen months. A proper pole barn electrical system needs careful planning around load calculations, circuit layout, and code compliance. Skipping steps or using residential shortcuts in a pole barn leads to tripped breakers, damaged tools, and fire risk. Gragg Electrical Services has wired pole barns across Stark County for over twenty years, and we know the local code requirements inside and out. This guide walks you through the correct approach so your barn is safe, powerful, and ready for whatever you plug in.
How to Wire a Pole Barn the Right Way for Power and Tools
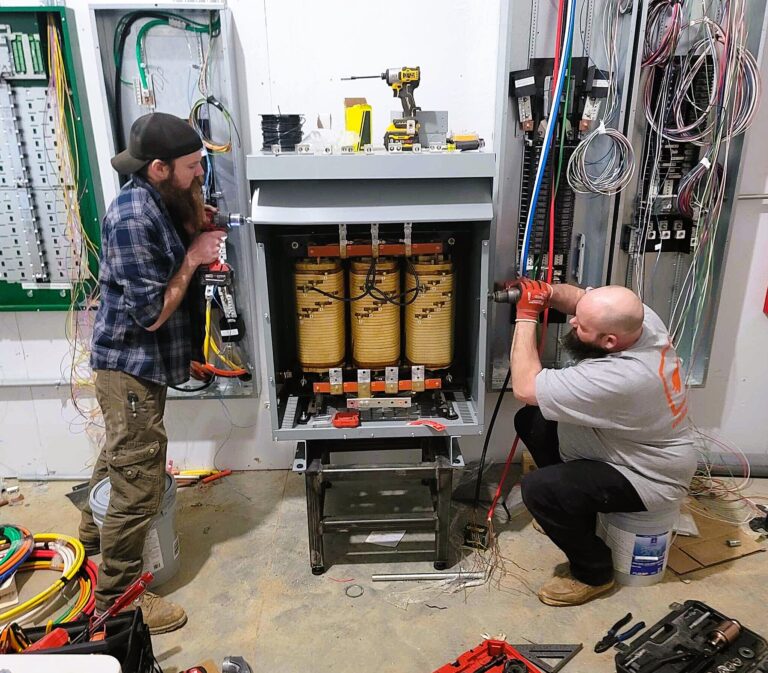
Wiring a pole barn the right way starts long before the first wire is pulled. You need to calculate your total electrical load, decide on a subpanel size, and map out every circuit based on how the space will actually be used. A barn used for woodworking has very different needs than one used for livestock or vehicle storage. The National Electrical Code treats detached structures with specific rules around feeder conductors, grounding electrodes, and disconnects. Getting these details right from the start saves you thousands in rework later. A licensed electrician handles the permit, inspection, and utility coordination so your pole barn passes on the first try.
Planning the Right Way to Wire a Pole Barn Before You Start
Load planning is the foundation of wiring a pole barn the right way. Add up the amperage of every tool, light, outlet, heater, and appliance you plan to run at the same time. A table saw, dust collector, air compressor, and space heater running together can easily push a circuit past its limit. Most working pole barns need at least a 100-amp subpanel, and larger shops often require 200 amps fed from the main house or a separate utility drop. Undersizing the feeder is the most common mistake homeowners make when they try to wire a barn themselves. A professional load calculation prevents nuisance tripping and protects expensive equipment.
Circuit layout is the next step in wiring a pole barn the right way. General-use outlets should be placed every six to eight feet along workbench walls so you never stretch a cord. Dedicated 20-amp circuits are required for heavy tools like welders, air compressors, and dust collection systems. Lighting should run on its own circuit so a tripped tool breaker never leaves you in the dark. GFCI protection is required for all 125-volt, single-phase, 15- and 20-amp receptacles in a pole barn under current code. Mapping circuits on paper before wiring begins keeps the installation clean and code-compliant.
Permits and inspections are not optional when you wire a pole barn the right way. Stark County and most local municipalities require a permit for any new service or subpanel installation. An unpermitted job can void your homeowners insurance and create serious problems when you sell the property. Inspectors check conductor sizing, grounding, bonding, disconnect location, and overcurrent protection. A licensed electrician pulls the permit, schedules the inspection, and stands behind the work. This is the safest and most legally sound path for any pole barn wiring project. Need pole barn wiring done right? Click here for our pole barn wiring service.
The Right Way to Wire a Pole Barn Subpanel and Feeder
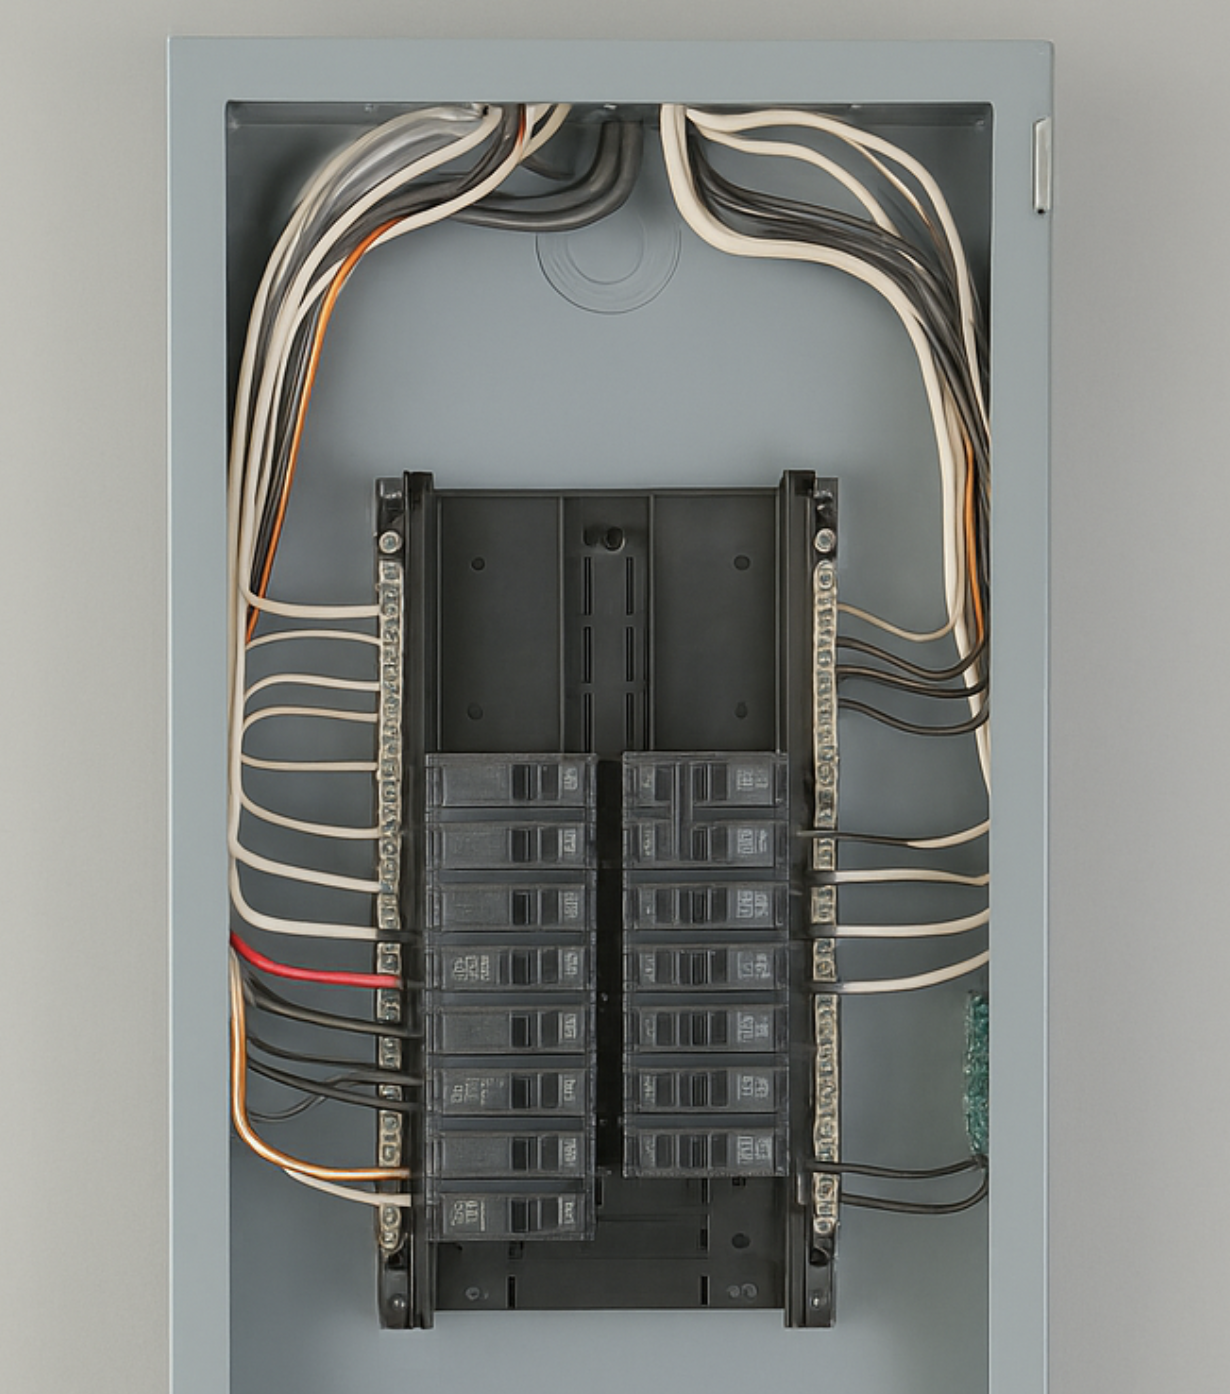
The feeder from your main house to the pole barn subpanel is the backbone of the entire system. For a 100-amp subpanel, you typically need 1/0 aluminum or 3 AWG copper conductors, though the exact size depends on the distance of the run. Voltage drop becomes a real concern on longer feeder runs, often requiring an upsize to 2/0 or 4/0 aluminum for barns more than 150 feet from the house. The feeder must include four conductors: two hots, a neutral, and a separate equipment grounding conductor. Direct-burial cable or conductors in PVC conduit both work, but conduit offers better long-term protection against rodents and damage. Burial depth must meet code, which is generally 18 inches for PVC conduit and 24 inches for direct burial.
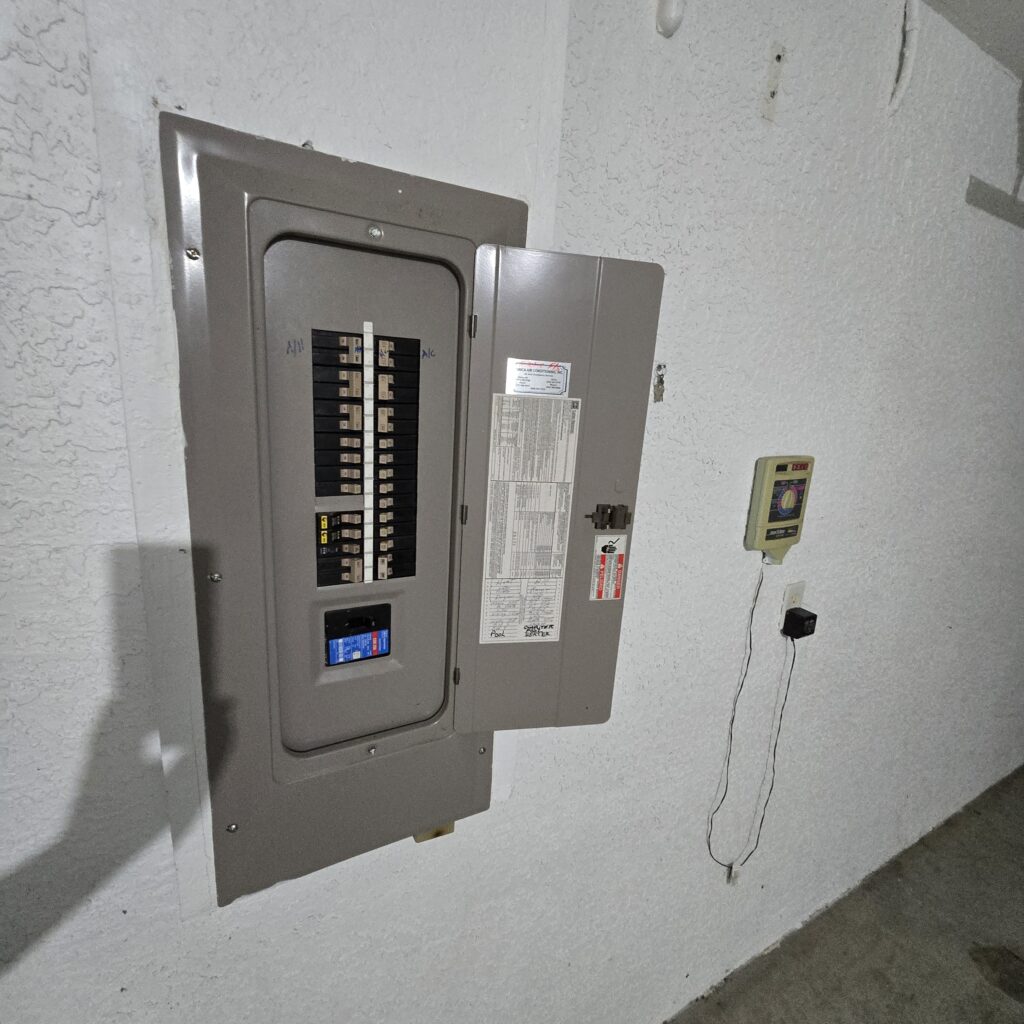
The subpanel itself must be installed the right way to keep your pole barn safe. Neutral and ground bars must be kept separate in a subpanel; bonding them together creates parallel paths and dangerous stray currents. A main breaker or disconnect is required at the barn, usually built into the subpanel, so power can be shut off at the structure during an emergency. The panel should be mounted at the proper working height with clear space in front, as required by code. Every circuit breaker should be sized to match its wire gauge, never larger. A properly labeled panel directory makes future troubleshooting simple.
Grounding at the pole barn is a detail that catches many DIY installers off guard. A detached structure with its own subpanel requires a grounding electrode system at the barn, separate from the one at the house. This usually means driving two ground rods at least six feet apart and bonding them to the subpanel’s ground bar with a 6 AWG copper conductor. The grounding electrode conductor must be continuous and protected where it enters the structure. Skipping this step is a serious code violation and a real safety hazard during a fault or lightning strike. A professional electrician handles grounding and bonding correctly every time.
Wiring a Pole Barn the Right Way for Tools and Outlets
Tool circuits are where a properly wired pole barn shines. Each 240-volt tool, such as a welder, compressor, or plasma cutter, needs its own dedicated circuit sized to the equipment’s nameplate rating. A common 50-amp welder receptacle uses 6 AWG copper on a 50-amp double-pole breaker. Smaller shop tools like drill presses and bench grinders usually run fine on shared 20-amp circuits, as long as the total load stays within limits. Twist-lock receptacles are a smart choice for tools that get moved around, since they prevent accidental unplugging. Every tool circuit should be labeled clearly at the panel for fast troubleshooting.
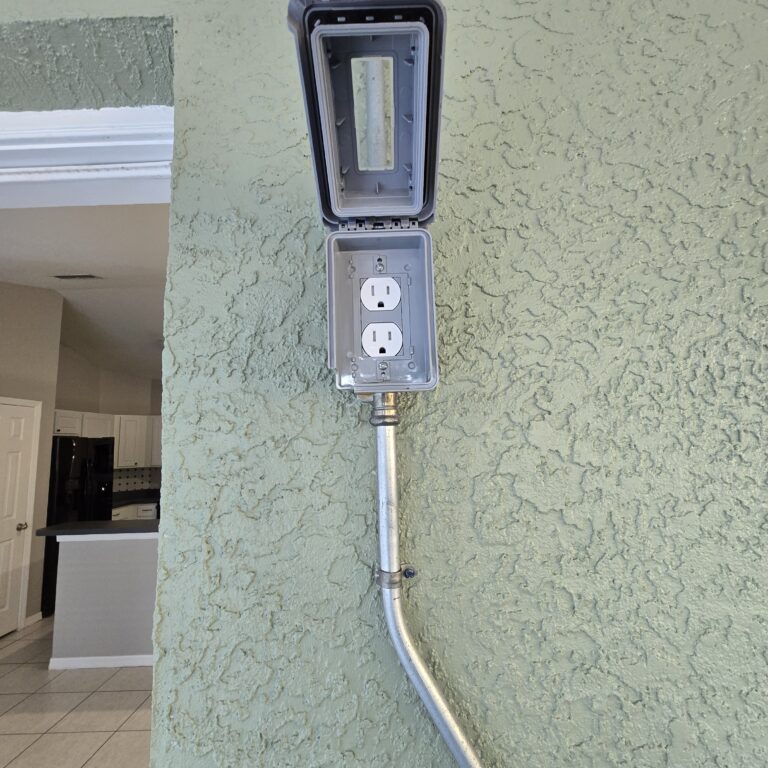
Outlet placement inside the pole barn should match how you actually work. Workbench outlets should sit about 42 inches off the floor so cords clear tools and clutter. Ceiling drop cords with retractable reels keep power available in the center of the shop without cords running across the floor. Exterior outlets on the barn should be weather-resistant, GFCI-protected, and housed in in-use covers. At least one outlet should be installed on each wall of the barn to meet general code for receptacle spacing. Adding a few extras during the initial install is always cheaper than running new circuits later.
Lighting is often underestimated when wiring a pole barn. LED high-bay fixtures have replaced older fluorescent tubes in most modern shops because they produce more light with less energy. Motion sensors on exterior fixtures add security and save power. Three-way switches at each entrance let you control the lights from any door, which is a small upgrade that makes a huge difference. Task lighting over the workbench should be wired separately from the general shop lights. Good lighting prevents accidents and makes detailed work far easier on your eyes.
The Right Way to Wire a Pole Barn for Code Compliance and Safety
Code compliance is not paperwork; it is what keeps your pole barn from burning down. The National Electrical Code has specific articles covering detached structures, agricultural buildings, and damp or wet locations, and pole barns often fall under more than one. Skipping GFCI protection, using indoor-rated materials outside, or bonding a subpanel like a main panel are the most common and most dangerous mistakes. Stark County inspectors know what to look for, and a failed inspection means tearing open finished walls. The right way to wire a pole barn starts with knowing the code and ending with a clean final inspection. A licensed electrician makes that path straightforward.
Code Compliance When You Wire a Pole Barn the Right Way
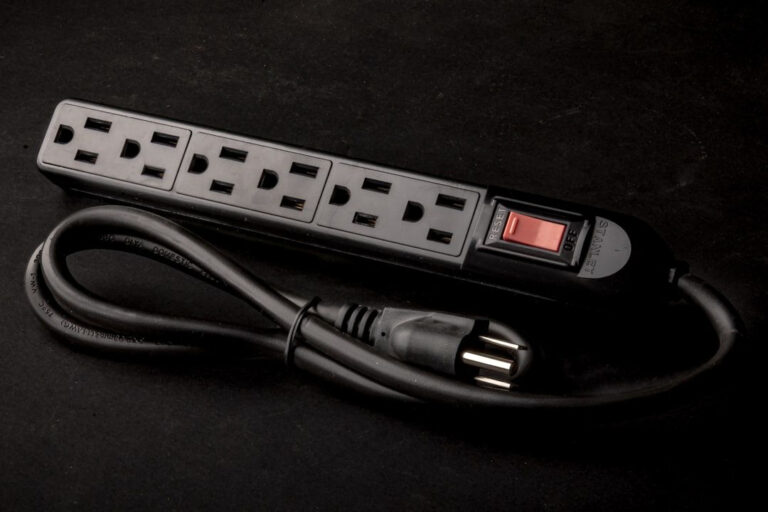
GFCI protection is one of the most important code requirements in a pole barn. All 125-volt, 15- and 20-amp receptacles in a pole barn are considered to be in a damp or wet location and must be GFCI-protected. This includes workbench outlets, ceiling drops, and exterior receptacles. GFCI breakers at the panel protect the entire circuit, while GFCI outlets protect themselves and anything downstream. In wet or dusty environments, GFCI breakers often outperform outlet-style GFCIs because they sit in a cleaner enclosure. This small upgrade has saved countless lives and is non-negotiable for a safe installation.
AFCI protection is another code requirement worth understanding. Arc-fault circuit interrupters detect dangerous electrical arcs that can start fires inside walls, and they are now required on most general-use circuits. In a pole barn, AFCI protection is required on circuits serving areas used for living, sleeping, or similar occupancy, such as a finished loft or office. Even in a pure workshop setting, AFCI protection is smart insurance against hidden wiring faults. Combining AFCI and GFCI protection on a single breaker, called a dual-function breaker, covers both risks at once. Modern panels are built to accept these breakers without any special hardware.
Wiring methods inside a pole barn must match the environment. Standard NM-B cable, often called Romex, is fine inside a finished, dry, heated barn with insulated walls. For exposed runs across trusses or along concrete walls, UF-B cable or conductors in EMT or PVC conduit are far better choices. In dusty or damp barns, conduit also protects wiring from rodents, which chew through plastic sheathing surprisingly often. Wet-location-rated boxes and covers are required on any exterior or exposed-to-weather installation. Using the correct materials from the start avoids rework and keeps your pole barn compliant for decades. Want to know more about safe wiring? Click here for our electrical wiring service.
Wiring a Pole Barn the Right Way With Proper Grounding
Grounding is the invisible system that keeps you alive when something goes wrong. In a properly wired pole barn, every metal tool, junction box, and appliance is bonded to the equipment grounding conductor, which ties back to the ground rods and eventually to the earth. If a hot wire ever touches a metal tool frame, the grounding system trips the breaker instantly instead of letting that frame become energized. Without proper grounding, a single damaged cord can turn a metal shop into a shock hazard. Every receptacle must include a ground pin that actually connects back to the panel. This is one of the most inspected items during a final walkthrough.
Bonding is related to grounding but serves a different purpose. Bonding ties all metal parts of the electrical system together so they sit at the same voltage during a fault. This includes the metal frame of the pole barn itself if it uses metal siding or a metal roof attached to the structure. Water lines, gas lines, and any other metallic systems entering the barn must also be bonded to the grounding system. Proper bonding prevents dangerous voltage differences between metal surfaces during a short or lightning strike. An electrician checks all of these points as part of a complete installation.
Surge protection rounds out a well-grounded pole barn. A whole-barn surge protective device installed at the subpanel protects tools, chargers, and electronics from voltage spikes caused by lightning or utility events. Pole barns sitting in open fields are especially vulnerable to induced surges from nearby lightning strikes. A Type 2 surge device at the subpanel costs a small fraction of what it would cost to replace a welder, compressor, or battery charger after a surge. Point-of-use surge strips add a second layer of protection for sensitive electronics like security cameras and smart chargers. Together, grounding, bonding, and surge protection form a complete defense system for your pole barn.
The Right Way to Wire a Pole Barn for Future Expansion
Planning ahead is one of the smartest parts of wiring a pole barn the right way. Running a larger feeder than you need today costs a little more up front but saves a full rewire later when you add an EV charger, welder, or mini-split heat pump. Installing an oversized subpanel with extra breaker slots gives you room to grow without replacing the panel. Stubbing conduit runs to future outlet locations makes adding circuits a quick job instead of a demolition project. Pulling a few extra conductors or a spare conduit during the initial install is one of those small choices that pays off for years.
EV charger readiness is one of the most common future-proofing requests we hear today. A Level 2 charger typically runs on a 40- or 50-amp 240-volt circuit, and wiring a dedicated space for one now costs far less than retrofitting later. Even if you do not own an electric vehicle yet, the resale value of a pole barn with EV-ready wiring is rising every year. The charger circuit should be run in conduit to the planned vehicle location, with the breaker space reserved in the subpanel. This small step keeps your barn flexible as technology changes.
Smart controls and subpanels built for solar or battery backup are also worth considering. A pole barn with south-facing roof surface is a great candidate for solar panels, and planning the electrical system to accept solar input later is straightforward during the initial install. Battery backup systems can keep critical circuits running during outages, which is valuable for freezers, well pumps, or heated livestock areas. Smart breakers and energy monitoring systems let you track usage by circuit from your phone. Building these options into the design now avoids costly retrofits and keeps your pole barn ready for whatever comes next.
Why You Need a Professional to Wire a Pole Barn the Right Way
Wiring a pole barn the right way is not a weekend project. Mistakes in feeder sizing, grounding, or code compliance create fire hazards, shock risks, and expensive rework. A licensed electrician handles the permit, the design, the installation, and the final inspection so your barn is safe and legal from day one. Gragg Electrical Services has wired pole barns across East Canton, Hartville, Louisville, Alliance, and the surrounding area for more than twenty years. Our crews show up on time, keep the job site clean, and stand behind every wire we pull. When you want pole barn wiring done right the first time, call a local team that knows the work.
The Right Way to Wire a Pole Barn Starts With a Proper Quote
A detailed quote is the first sign of a professional pole barn wiring job. We walk your property, measure the feeder run, review your planned tools and equipment, and build a written estimate that covers every circuit, outlet, and fixture. There are no surprise charges once the work begins. We explain exactly what the code requires, what your specific barn needs, and where you have flexibility to save money or upgrade for the future. Clear pricing and clear scope keep the project on track. Financing is available through GreenSky and Turns for larger pole barn installations.
Scheduling is another place where a professional makes the difference. We coordinate with general contractors, concrete crews, and inspectors so the electrical rough-in happens at the right stage of construction. For existing pole barns, we schedule around your work and family life to minimize downtime. Most pole barn wiring jobs are completed within a few days once materials are on site. We also handle the permit application and inspection scheduling so you do not have to spend a day on hold with the county. Start-to-finish project management is part of what you get with a licensed electrical contractor.
Warranties matter when you hire someone to wire a pole barn. Every installation we perform is backed by our Lifetime Craftsmanship Guarantee, which covers the workmanship for as long as you own the property. Manufacturer warranties on breakers, panels, and fixtures add another layer of protection. We document the installation with photos and a panel directory so future electricians can understand the system at a glance. A written warranty on your pole barn wiring is peace of mind you cannot buy from a handyman or a DIY install.

Wiring a Pole Barn the Right Way Means Hiring a Licensed Electrician
Licensing and insurance protect you as a homeowner. A licensed electrician carries state credentials, ongoing code training, and liability insurance that covers your property if something goes wrong. Unlicensed work often fails inspection, voids insurance claims, and creates legal problems during a home sale. Ohio requires licensed electrical contractors for any work involving new circuits, service changes, or subpanels. Verifying the license of anyone you hire is a simple step that prevents serious problems later. Gragg Electrical Services is fully licensed and insured for every job we take on.
Experience with pole barns specifically is worth asking about. Pole barn wiring has its own quirks, from the long feeder runs to the exposed framing to the mix of dry, damp, and wet locations under one roof. An electrician who mostly wires new tract homes may not be familiar with agricultural building codes or large feeder calculations. Our team has wired pole barns used as workshops, garages, hobby spaces, and small-business shops across Stark County. That hands-on experience means fewer surprises and faster, cleaner installations. Ask any contractor you consider how many pole barns they have wired in the last year.
Emergency service is another reason to hire a local electrician. If a breaker trips at midnight or a feeder fault knocks out power to your barn during a storm, you want someone you can call directly. Our 24/7 emergency service keeps your pole barn running when problems come up at the worst possible time. Need emergency electrical help? Click here for our emergency electrician service. Local response times beat anything a big regional company can offer. That kind of support is hard to find from an out-of-town contractor.
Why Choose Gragg Electrical Services to Wire Your Pole Barn the Right Way
Gragg Electrical Services has served East Canton and the surrounding communities for more than twenty years. Our Lifetime Craftsmanship Guarantee stands behind every pole barn installation we complete. We show up in clean uniforms, protect your property during the job, and leave the site spotless when we finish. Our crews are respectful, professional, and focused on doing the job right the first time. You will notice the difference from the first phone call.
We offer financing through GreenSky and Turns to make larger projects easier on your budget. A full pole barn wiring installation is a meaningful investment, and spreading the cost over manageable payments keeps the project moving. Our 24/7 emergency service is always on standby for existing customers and new ones alike. Whenever you need us, we are ready to respond.
Call us at (330) 488-8009 or email info@graggelectrical.com to schedule your pole barn wiring estimate. We serve East Canton, Hartville, Louisville, Alliance, Canton, North Canton, Massillon, and the surrounding Stark County area. Twenty years of proven local experience means your pole barn will be wired the right way the first time. Gragg Electrical Services is proud to power the workshops, garages, and hobby barns of our neighbors. Let us help you build a safer, smarter, more powerful pole barn today.